Apple Device Projection Instructions
The following Apple device projection instructions include these important topics:
Connecting to the Classroom Projection System
-
Cables are located in the cable cubby of the instructor's podium. Connect the VGA, or HDMI (where available), cable to the device. To connect to the classroom projection system, you may need an adapter. The type of adapter required varies by device model and age (see next page on adapters). myIT supplies a ring of HDMI Adapters including Mini DisplayPort-to-HDMI adapter in rooms where HDMI is available. If your device does not have a Mini DisplayPort/Thunderbolt port or the room is not equipped with HDMI you must provide your own adapter.
-
Connect the audio cord, if using the VGA connection, to the headphone jack of your device (not the microphone jack) to have audio projected through the system speakers. Please note that the audio cord is not for use with HDMI.
-
Press the Laptop source button on the control panel. When the button stops blinking, start the device.
-
When using the HDMI connection with a Mac, you may need to adjust your sound settings for the Mac’s audio to come through the classroom speaker system. Go to your Mac’s System Preferences, select Sound, select the Output tab, and select the HDMI source.
Guide to Mac Adapters
-
Some Apple Macintosh devices and all iPads/iPhones require an adapter to connect to the standard VGA and HDMI cables in general purpose classrooms. Any model with an HDMI output can connect directly to the HDMI input where available.
-
All recent (manufactured after October, 2008) and currently shipping Mac laptops have a Mini DisplayPort (aka “Thunderbolt”) connection that is compatible with the HDMI to Mini DisplayPort adapters supplied in classrooms. The Macbook Pro with Retina Display models (13 and 15 inches) also have HDMI ports. If you are using one of these models in a room equipped with HDMI, you will not need to use an adapter and it is recommended that you use the HDMI connection.
-
IMPORTANT: The following Apple laptop models do not support audio when connected to an HDMI adapter: MacBook (Late 2009), MacBook (13-inch Aluminum Late 2008), MacBook Pro (late 2008), (Mid 2009), and (Early 2009). To project audio with these laptop models, use the audio cable and VGA connection at the instructor station (you will need to supply the VGA adapter for your model).
-
Apple models older than 2008 may or may not display using VGA in classrooms that have been upgraded to HDMI. In these select cases, the video image may or may not display via HDMI using your DVI-to-HDMI adapter. The adapter will not support audio. If audio is required, you must supply a more current model.
-
-
When troubleshooting, be aware that adapters do sometimes malfunction or wear out. Consider adapter replacement as part of your troubleshooting options.
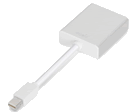
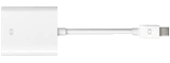
Note: myIT only supplies Mini DisplayPort adapters (HDMI only in HDMI-available rooms)
|
|
Most Mac laptop models require the Mini DisplayPort-to-VGA adapter (left). If using HDMI, laptops require the Mini DisplayPort-to-HDMI adapter (right). myIT supplies a Mini DisplayPort - HDMI adapter in rooms that have been upgraded to the Digital standard)
|
|
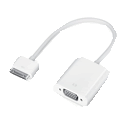
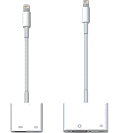
iOS Devices (iPads and iPhones) - These adapters are not supplied in classrooms
|
|
The Apple 30-Pin VGA Adapter (left) supports video mirroring on iPad 2, iPad (Third Generation), iPhone 4S, and video out (only) on iPad (1st generation), iPhone 4, or iPod touch (4th generation). Apple Lightning-to-VGA or Lightning-to-HDMI adapters (right) supports mirroring on iPad with Retina display (Fourth Generation), iPad mini, iPad Mini with Retina Display (1 and 2), iPad Air (1 and 2), iPhone 5/5C/5S, iPhone 6/6 Plus, or iPod touch (5th generation). Please note that adapters for use with Mac laptops (Mini DisplayPort) will not work with iPads/iPhones. |
|
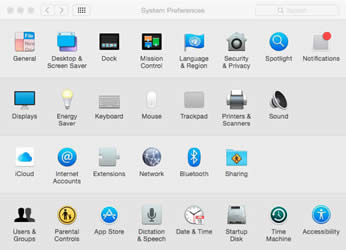
Common Troubleshooting Tips
After connecting a laptop, if the image does not display on the projection screen, try these troubleshooting tips.
-
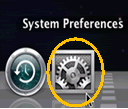
Open System Preferences on your laptop. (Look in the dock for an icon that looks like a grey box with a gear icon, or in the Apple menu.
-
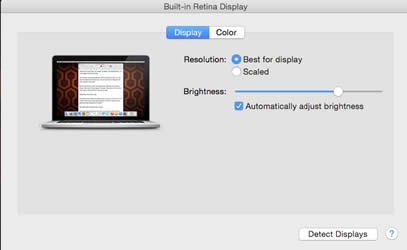
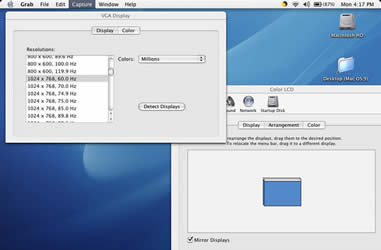
Click Displays, hold down the option key, then click the Detect Displays button. The image should appear on the projection screen.
-
If the issue is related to Internet connectivity, make sure to either turn on Wi-Fi (using the setting at top of desktop near the clock), or connect to the classroom’s wired network jack.
|
|
|
|
|
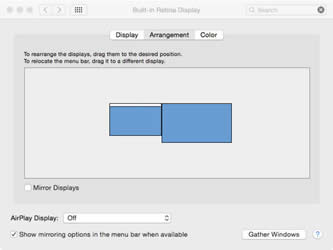
To have the same image on both screens, locate and check Mirror Displays (located in the Arrangement tab). Note: Some software pro-grams, such as PowerPoint, may extend the desk-top in presenter mode. You can adjust the display to mirror in the slideshow tab.
|
|
|
|
If the image is distorted, or you see an error message that indicates Frequency out of range, you may need to adjust the monitor resolution:
|
For troubleshooting on adapters, see the Guide to Mac Adapters section. If these tips do not resolve the issue, you may need to fully power down your laptop or device and try again.
If you have questions about Apple laptops or devices in general purpose classrooms, please contact the Classroom Support Hotline at 402.280.1111 Option 1
 2500 California Plaza